Saturday, August 9, 2025

F for #letteroftheweek

It’s been a few months since I’ve posted - I’m back at it - thanks for stopping by. 

 I’ve been following Anne Kenlon, Junk Journal artist, cardmaker, quilter, grandma and more. 

Anne has been choosing a random letter of the week for inspiration each Sunday. 

Find my #letteroftheweek projects on Instagram at card.connoisseur or Facebook, Card Connoisseur Susan Boback. 

F is for Flowers or Floral. Since it’s August, my garden Flowers are in Full bloom.   

Are you a gardener?   Did you know you can plant tulip bulbs in the fall in a pot you keep indoors in a cool dark spot; and in the spring, like Feb or March, indoors, you can do what's called "forcing".  You take them out of the spot you've wintered them in, and place them in the sun. Water lightly and watch the tulip awaken to a "spring-like" growth.   This is especially enjoyable if you are stuck indoors for a long cold winter.  But we won't think about that just now!

 
Lily
                                                           Globe Thistle with a bee
                                                                           Peas
                                                                              Hostas

So when you see the beautiful shades of color in your garden Flowers you want to create paper versions to keep your memories around for awhile after the bloom is gone, right?


This Sunflower 3D Embossing Folder, is one of the most versatile I’ve seen. What makes it "3D" is its deep embossed texture. 
I've used Night of Navy ink on Very Vanilla Cardstock with the Sunflower 3D Embossing Folder, layered on a Night of Navy card base for today's project. (An Embossing Machine is needed to use the embossing folders.) 
You can easily create a design that really makes the sunflowers pop. 

Drag the ink pad over both sides of the inside of the EF (embossing folder) to dispense the ink. Place your paper on and close the EF. 
Run it through your embossing machine then open the folder to see the results!
Since you’ve placed ink on both sides, you’ll have one print that shows embossed such as this; and the other side that shows debossed design where the background is elevated (not shown).
Trim the print to 4 x 5 1/4” for a front layer. 

Other techniques include: 
*    embossing alone on white, vanilla or a color cardstock - no ink added in the embossing process
*    ink techniques: emboss on white, vanilla or color cardstock, then adding ink with a sponge dauber or a Stampin' Write! water based marker, or a Stampin' Blends alchohol based maker, or a water color pencil then using a Water Painter on top to give it a watercolor look.   You can also flick ink drops at random around the embossed area
*    add gold or silver rub-ons 
*    Heat emboss to highlight the images - with heat embossing you could add the Versa Mark clear watermark Ink to the folder before embossing the texture with the folder; then sprinkle with embossing powder and heat; or you could add the Versa Mark to the images after you run it through the embossing machine.  

Practice these techniques to see which you like - there's always more to learn!
And there's always more to learn!


Find current products by clicking on the links or from the Annual Catalog, Online Exclusives, new kits or Last Chance sale items here at my Stampin' Up! website.  Did you know that there are new kits every month?

In September 2025, the new Fall Catalog will be available - beautiful new fall and harvest papers and stamps.   There's so much to see - can't wait to show you how easy it is to make beautiful cards with simply coordinated products for everyone you want to connect with!
 
Visit here for all the products I've referenced today www.stampup.net 
If you don’t have a favorite demonstrator I’d love to be yours - I’m Susan Boback. 
Thanks for stopping by and be blessed!


Saturday, January 18, 2025

Embrace the Journey Pinwheel

Hello Friends!  Welcome to our blog hop "Stamping With Friends" where today's focus is our NEW Mini Catalog - January - April.  


In mid-January, I saw my Team Leader Karen Titus, demonstrate this folded Pinwheel design. Here's my design with the new paper, Everyday Skies and Everyday Arches from the NEW Mini Catalog.  


The theme of this card - Embrace the Journey - can be sent to a college student, someone who is moving, or experiencing a change in their life.  Sending cards of encouragement is one of my main focuses. 

This Folded Pinwheel, I am calling it, is fairly simple.  Grab a 6x6" piece of double-sided paper that you like the prints and colors of both sides, because both sides will be shown; score around the 4 sides.  Cut out the four corners, cut each side in a half triangle, fold in and done. Read on for more specifics and photos.

Materials:

1 - 6x6" Double-sided paper - this paper is Everyday Skies

1- 4 1/4" x 5 1/2" card with the fold at top or on left (an A2 card by definition) - the color is Basic White with a 4 x 5 1/4" layer of Moody Mauve.

Stamps - Birds and "Embrace the Journey" sentiment - Everyday Arches

Ink - Blueberry Bushel - birds and sentiment; VersaMark, clear watermark ink - background sentiment on layer

Embellishments - Two-tone Sparkle Gems

Mini Dimensionals to pop up the two center birds


Here's the instructions:


Take a 6x6" - choose one with no directional pattern, score at 1 3/8" on all four sides.

Cut out each of the 4 corners, on the score lines.

Fold in the side tabs remaining after removing the four corners to crease the score lines.  

Cut each side tab from the inner corner, out to the outer corner edge.  Set aside the triangle pieces for another project.  (To cut each tab into a triangle, fold down the top tab and fold up the bottom tab to keep them out of the way of the cutting blade.)  

Here's the way it will look

Fold each tab under the one next to it - they will stay folded down.   Your design could open each tab to reveal a message or the tabs could remain closed.

Add a 3 1/2" contrasting color cardstock layer if desired.

Position your square layer before you glue it on so that it doesn't go over the edges of the card.

Add a die cut or punch art, sentiment and embellishments.

----------------------------

Make two more cards with the remaining triangles and corner squares. 

This card uses 3 of 4 triangles from Perennial Lavendar papers, and 3 of 4 triangles from In-Color Papers, Spring Celebrations Ephemera for the sentiment, and Dotted Circles Embossing folder for texture.  Add a ribbon of your choice for accent. 


Using 6 of 8 squares from 2 cards of today's featured design, make the card below.
Stamp the corner sentiment with Spring Corners stamps.  Add ink on a block then stamp it directly on the Basic White cardstock, and use the sunburst and heart dies from Spring Corners Dies . 
(Save 10% if you purchase the stamps and dies as a bundled set)


Thanks for stopping by!  Be Blessed! sb   (Sorry, there's an error in my html so you won't be able to connect to the others with this post.)


Saturday, December 21, 2024

BLUE

Blue is the color I think of for the Winter Solstice (the 3rd week in December) through January 31.  Here in the central Upper Peninsula of Michigan USA, the colors in the middle of winter are mostly white enhanced by blue skies and sunshine that bounce the light off of the white snow.

During January, there are no holidays or festivities to decorate for. This is when I display my snowmen, snowflakes and wintery colors like blue and silvery metallics - all representing what I see when I look outdoors.

Today's Stamping with Friends Blog Hop - Inspiration from Around the World - is focusing on the Stampin' Up! products that will soon retire.  I've used Regal Distressed Specialty Paper in white, adding blue. 

Stampin' Up! Products include a new catalog every four months, with products and kits added each month to our online store.  The catalog products are retired at the end of each seasonal or annual catalog.

Find the Stampin' Up! Products  I used here in my online store or click the link for each in the instructions.

    *Balmy Blue Ink, Cardstock

    *Blueberry Bushel Ink

    *Blending Brush

    *Regal Distressed Specialty Paper (Retiring, listed on "Last Chance" list)

    *Forever Plaid Embossing Folder with Stampin' Cut & Emboss Machine

    *Winter Meadows Designer Series Paper

    *Frosted Forest Decorative Masks

    *Iridescent Ribbon

    *Embossing Paste

    *Wink of Stella

    *Tombo Multi-Purpose Glue

    *Ephemera


My project, "Blue," uses this Specialty Paper, but any paper that has metallic effects with a light background will work.


In thinking of how the blue sky enhances the look of the snow with the bright sun, I've taken this specialty paper and shaded it with Balmy Blue ink, using a small Blending Brush. This will make the metallic lines of the design stand out. 


To make the metallic stand out even more, I have used the Embossing Folder, Forever Plaid.   Next I added a darker blue of Blueberry Bushel by lightly dragging an ink pad over the raised, or embossed plaid pattern.  Set this aside.

I chose the Winter Meadows paper with the blue water-color look trees in the background.   Make a circle for the front design either by punching out a piece with a 2 3/8" punch or by using the Spotlight on Nature dies or similar.  Use embossing paste or a modeling paste and spread it across a pine tree mask in a thin layer, then clean the mask or stencil immediately in warm water.   

This is the Modeling Paste I make and use:  mix 8 Tablespoons of Baking Soda, 3 Tablespoons of White Latex Craft Paint (You can use any color of paint to suit your needs) and 2 Tablespoons White Glue (I use Tombo Multi Purpose Glue.  When the glue dispenser gets low, I set it aside for use in projects such as this) Mix thoroughly together and keep in an air-tight container. I use a glass jar.)


Add Wink of Stella to the frosted tree once the paste is dry, as shown above. Attach a 7-inch piece of iridescent ribbon under the circle and then attach the circle to the center of the plaid layer. Add a sentiment with Ephemera  - or your favorite words.   

Use Balmy Blue Card stock as the card base.   Blue. Its the color of January, winter, and 2025.  Thanks for hopping along.  Click the link to view the next creative project. Happy Holidays!sb


Do you love the quality and color coordination of the blues and products used today? Why not consider choosing $125 of your favorites and pay only $99?  I'd love for you to join my team, Card Connoisseurs, as a hobby crafter or pursue a business, and where you get a discount with every order and can earn points for free products.   

Saturday, December 7, 2024

Swedish Flower & Paper Beads Ornament


Hello friends:

Lets make a paper ornament that doesn't take any glue or adhesive!  And our Designer Series Papers that are beautifully coordinated on both sides are perfect for this project.  Today's focus for Stamping With Friends Blog Hop is Blogger's Choice.  


I'm in love with paper, have been all my life. A friend that is a weaver shows us how folding double-sided papers, and with no gluing, a beautiful paper ornament can be made.   This ornament did take some practice, but once you "get it" you will make a few.

There's a few tricks or hints that are important: 

Make sure your measurements are exact.  

Don't make something simple complicated.  

Here is my video demonstration link that shows how to make the 2  diamond shaped paper beads. The photos below show making the Swedish flower center.   

Card Connoisseur | Facebook   

MAKE THE DIAMOND SHAPED BEAD:

Cut a strip of paper 9 1/2” long by 7/8” wide

Score on the long side, 7/8” across until you have 9 sections that each measure exactly 7/8”, then an end tab that is NOT 7/8”. Make the end tab into a point.

 For your practice pattern, label each 7/8” section consecutively, 1, 2, 3 and so on up through 9. In practice, you may wish to number both sides of the paper, until you get the concept of folding the sides of the diamond together

FOLD each 7/8” section on the score lines, then open it to lay flat

Hold the left end in your left hand and the right end in your right hand

Take the left end and while you’re pulling it over to the right, twist it up so that the fold line between #3 and #4 square meets the edge of the #6 square.   Wrap it under #6 which bringing the left end up, then tuck the #1 square (end square) under the #4 square – this creates a diamond shape, then continue to turn and twist the diamond, while wrapping the right side squares around the entire shape in this order:  the #7 covers the #2, the #8 covers #5, #9 covers #4

Then the remaining end tab gets tucked under #7, and make sure to pull it taught, and trim off the excess.

Your Diamond shaped paper bead is complete!    Make the second bead out of the same print or the reverse side of the paper.

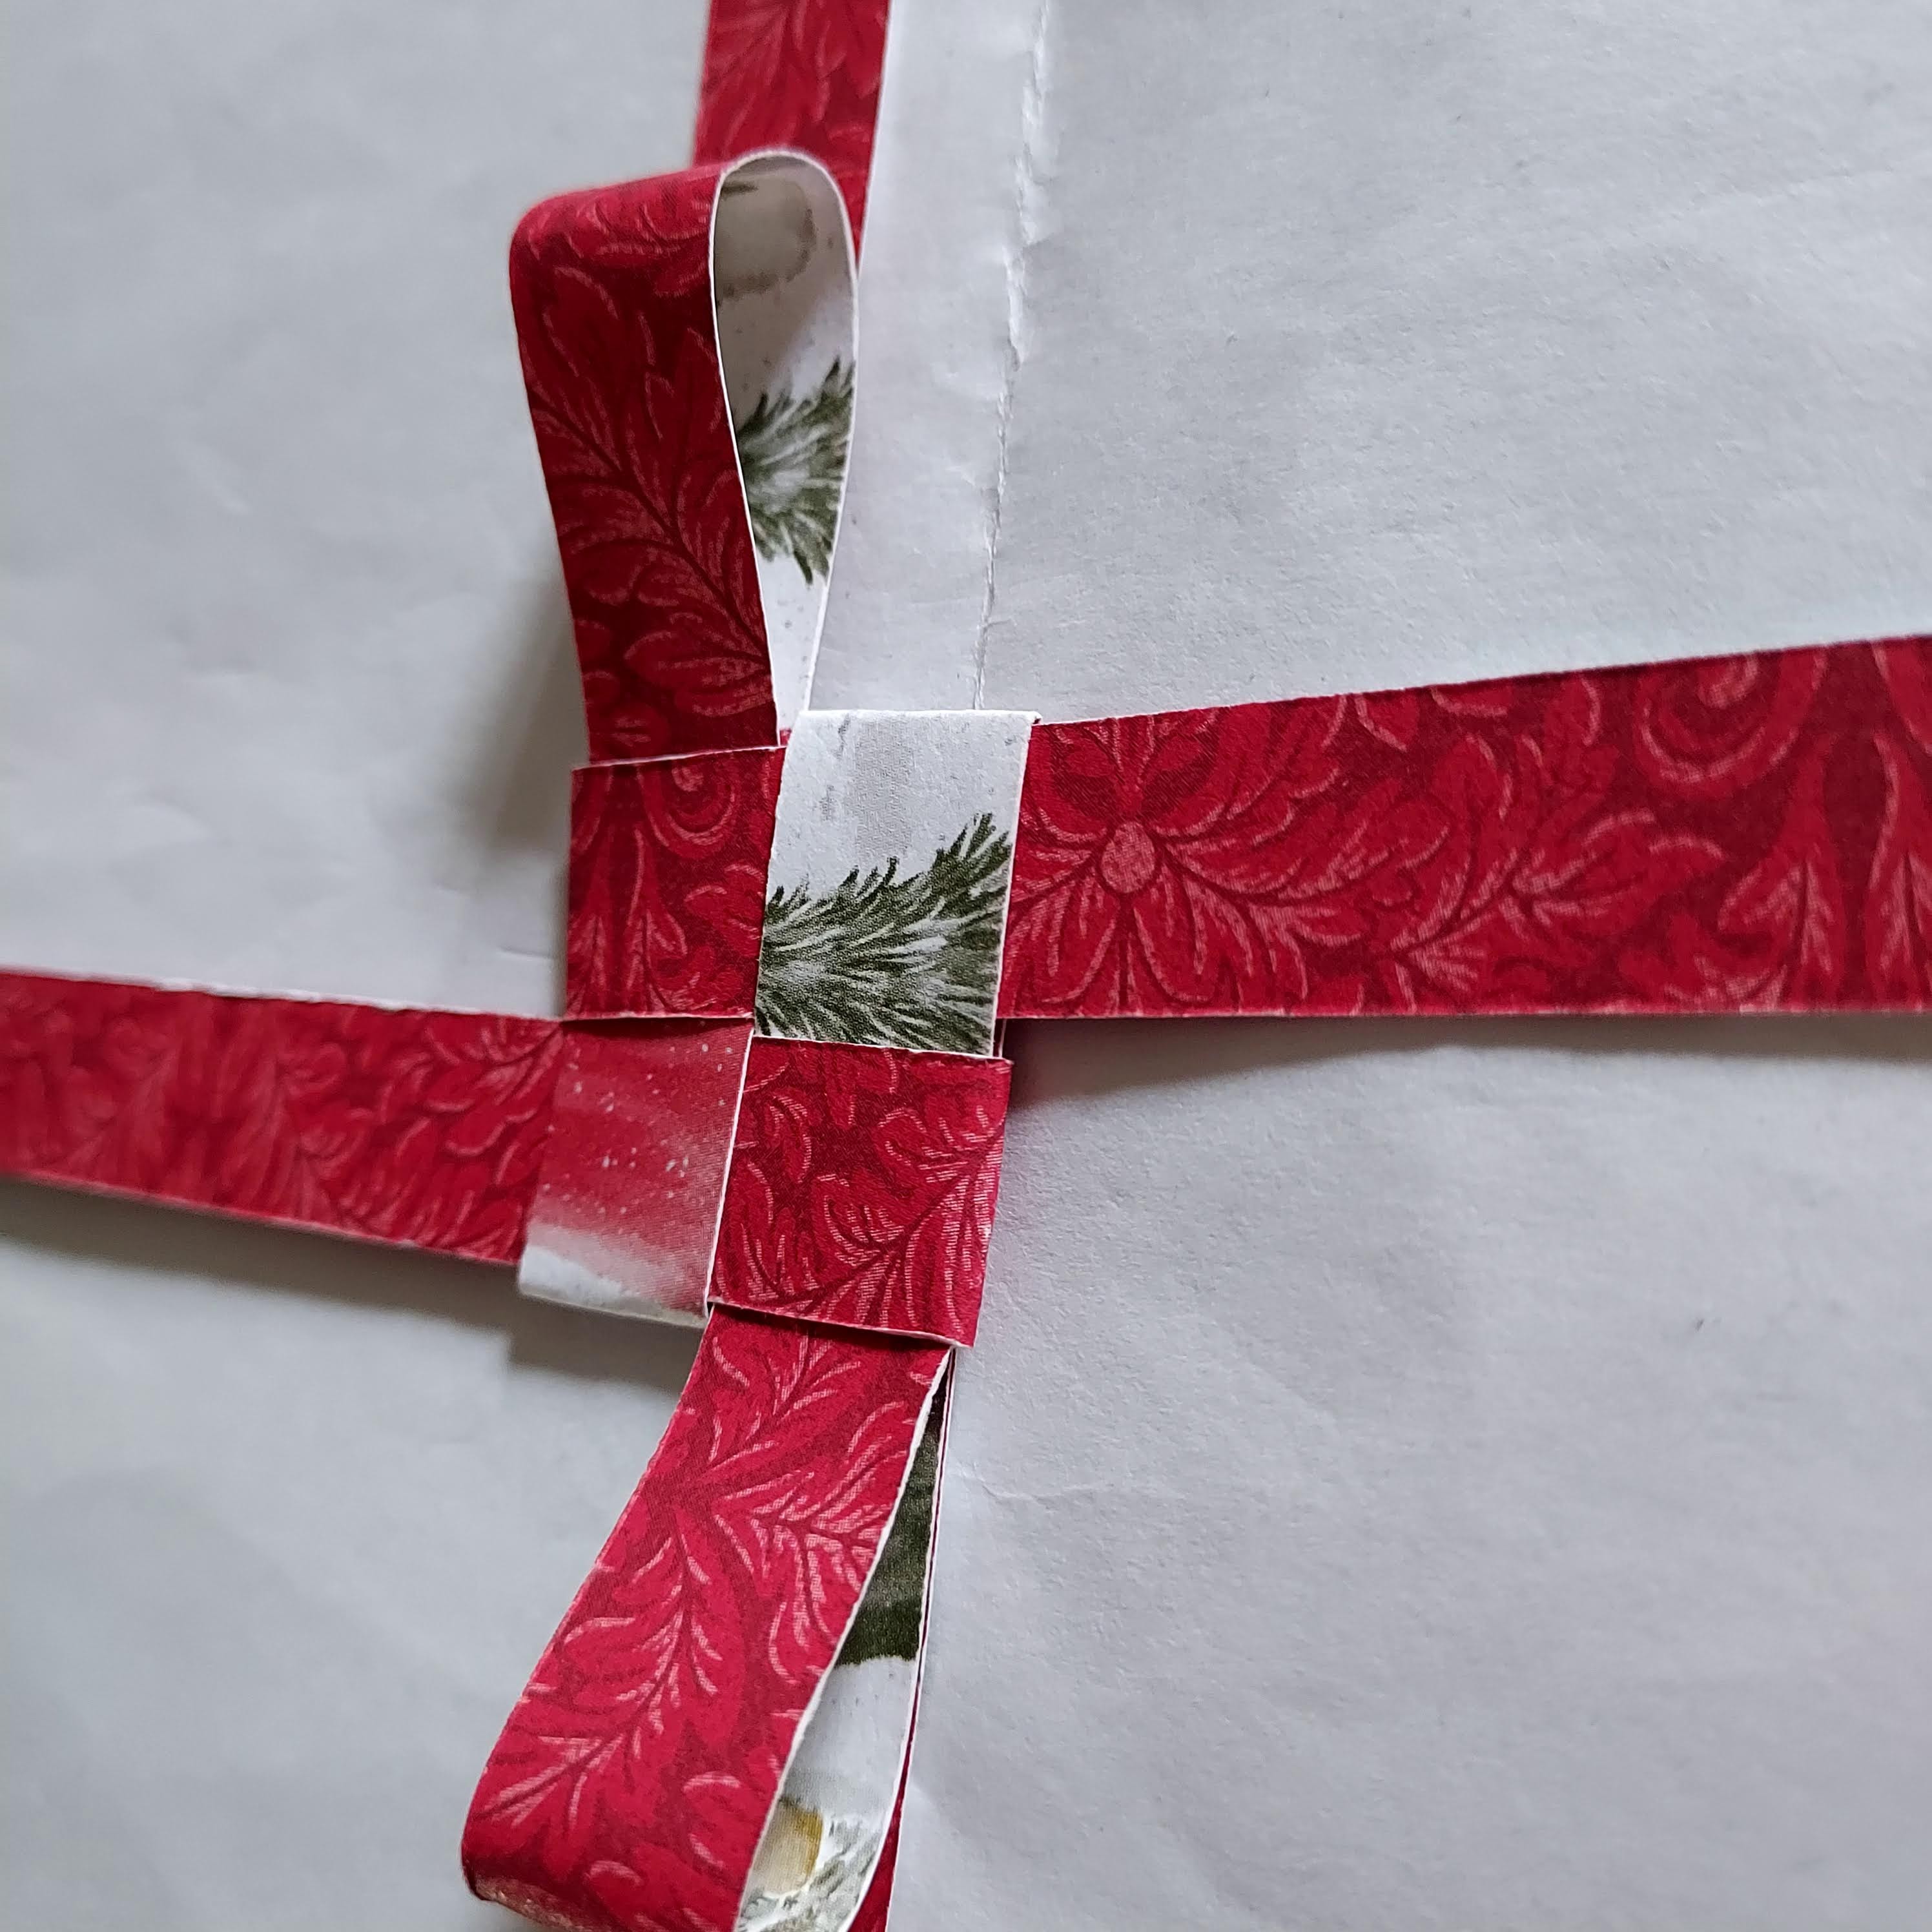
MAKE THE FLOWER CENTER:

Cut four pieces that are ½” x 7 ½” – if you use all the same double sided, use 2 of one side print and 2 of the other side print.  You may wish to use an older paper, that you can keep for a sample.

Fold each one exactly in half, then lay them out - one with the fold down and one with the fold up. 

For the Over and Under for this design: 

OVER means over the top and the bottom (see this on the video at 14:22 minutes/seconds into the video) 

UNDER means under the top but through the piece (see this on the video at 14:37 minutes/seconds into the video)


Weaving the strips together:  The 1st strip (with the fold on the left) is OVER the left vertical strip and through the right vertical strip. 

Weave the 2nd strip (with the fold on the right) the top piece goes OVER the right vertical strip, then both pieces go through the left vertical strip. 


Push the 2 vertical and the 2 horizontal strips together so they are tight and form 1 square, with 4 – ½” squares. 

Now take each end of the 4 strips and fold it back on itself then tuck it under the paper towards the center. This makes the "petal" of the flower. 

Turn over and repeat. 


Now you've made the double-sided “Flower” for the center of your paper bead ornament. 

ATTACH the beads, one on top of the flower, and one below, with a long needle. Thread it up through the tip of the bottom diamond bead, up through the center of this flower, and up through the bead that is on top. Make a loop for a hanger. You may wish to add jewelry beads and baubles to embellish your ornament.


This is a card made by using two of the flower centers.  Lay two next to each, attach, then machine emboss for texture. 


                                            Use two of these to make the design of a card

And that's all there is to it - make two paper beads, making sure your sections are exactly 7/8" long and the strip is 7/8" wide.  Practice folding on a numbered piece.   Make two.   Fold the flower by weaving the paper strips together. Then attach the bottom bead to the flower and the top bead.   

Shop for the Online Exclusives and new kits added every month.  A new catalog will be out early January, 2025.  www.cardconnoisseursb.stampinup.net 

Thanks for stopping by.  I'd love to see your ornament.  Stop by at Card Connoisseur Susan Boback on Face Book or card.connoisseur on Instagram.   Go get Crafty and Be Blessed!sb


Blog Hop Index